Showing posts with label Diary Blog. Show all posts
Showing posts with label Diary Blog. Show all posts
Wednesday, September 21, 2011
Diary Blog - Term 3 - Week 8
Week 8
This week i worked out the values of the Capacitor and Inductor values for my crossover and put them into my Circuit Wiz design. The two crossover over frequencies i have used is 1000kHz and 3500kHz. The Capacitor values i have used are based off the Loudspeaker Cook book. I also went down to Jay Car to purchase the capacitors and inductors
Problem In-counted: Converting the capacitor and inductor values into their correct form. e.g. mF, uH, F, uF H
Problem Solved: I researched online on how to convert these values.
Next Steps: To Finnish off the 2D design work and to cut out the crossovers.
Diary Blog - Term 3 - Week 7
Week 7
I started on creating my crossover in Circuit wizard. I have acquired advice from the expert teacher, Mr. Hawkings. He suggested that i do a Dual (2) two-way 2nd order Bessel Crossover, as it is to advance to create a 2nd order three-way Bessel crossover. The Dual two-way crossover will achieve the same results as the 3-way. You place each crossover between the Tweeter and Mid, and between the Mid and woofer.
I started on creating my crossover in Circuit wizard. I have acquired advice from the expert teacher, Mr. Hawkings. He suggested that i do a Dual (2) two-way 2nd order Bessel Crossover, as it is to advance to create a 2nd order three-way Bessel crossover. The Dual two-way crossover will achieve the same results as the 3-way. You place each crossover between the Tweeter and Mid, and between the Mid and woofer.
Diary Blog - Term 3 - Week 3
Week 3
This week i started to glue my box together using a high strength all-purpose glue. We used ratchet clanks and ties to hold the boxes together while the glue settled. We also used the racket clanks to apply more force to the box as normal clamps would not apply enough pressure to the box.
Problem In-counted: The initial idea of put the strap directly to the box wouldn't work as the glue would stick the straps to the box.
Problem Solved: So we made wooden clips that went along the side of the box and placed paper in between. The clips also helped to apply the force from the straps evenly over the box.
Next Steps: Wait for glue to dry and to foam my box.
Diary Blog - Term 3 - Week 5
Week 5
I started to foam my box. it was quite tricky and tight trying to put the foam into place while trying to staple it onto the box. Things were initially going good until the foam was thrown out. This delayed the foaming process so i worked on my paper work and blog.
I started to foam my box. it was quite tricky and tight trying to put the foam into place while trying to staple it onto the box. Things were initially going good until the foam was thrown out. This delayed the foaming process so i worked on my paper work and blog.
Wednesday, August 17, 2011
Diary Blog - Term 3 - Week 4
Week4
This week i finished off glue my box together. The box turned out well and seemed very sturdy. On top of gluing my box, I helped out many other people finish their box of and help glue them together.
Problem In-counted: Some boxes were odd shaped and didn't fit the designed brackets for the square boxes.
Problem Solved: Packers were placed instead and clamps were used instead of ratchet clanks.
Next Steps: Start working on my crossover.
Tuesday, August 16, 2011
Unit Standard - 7481
 |
| Speaker Box - Sketched & Pre-Extruded |
 |
| Speaker Box Shelled + Section View |
 |
| Speaker Box - Post-Cut Rear Ports |
 |
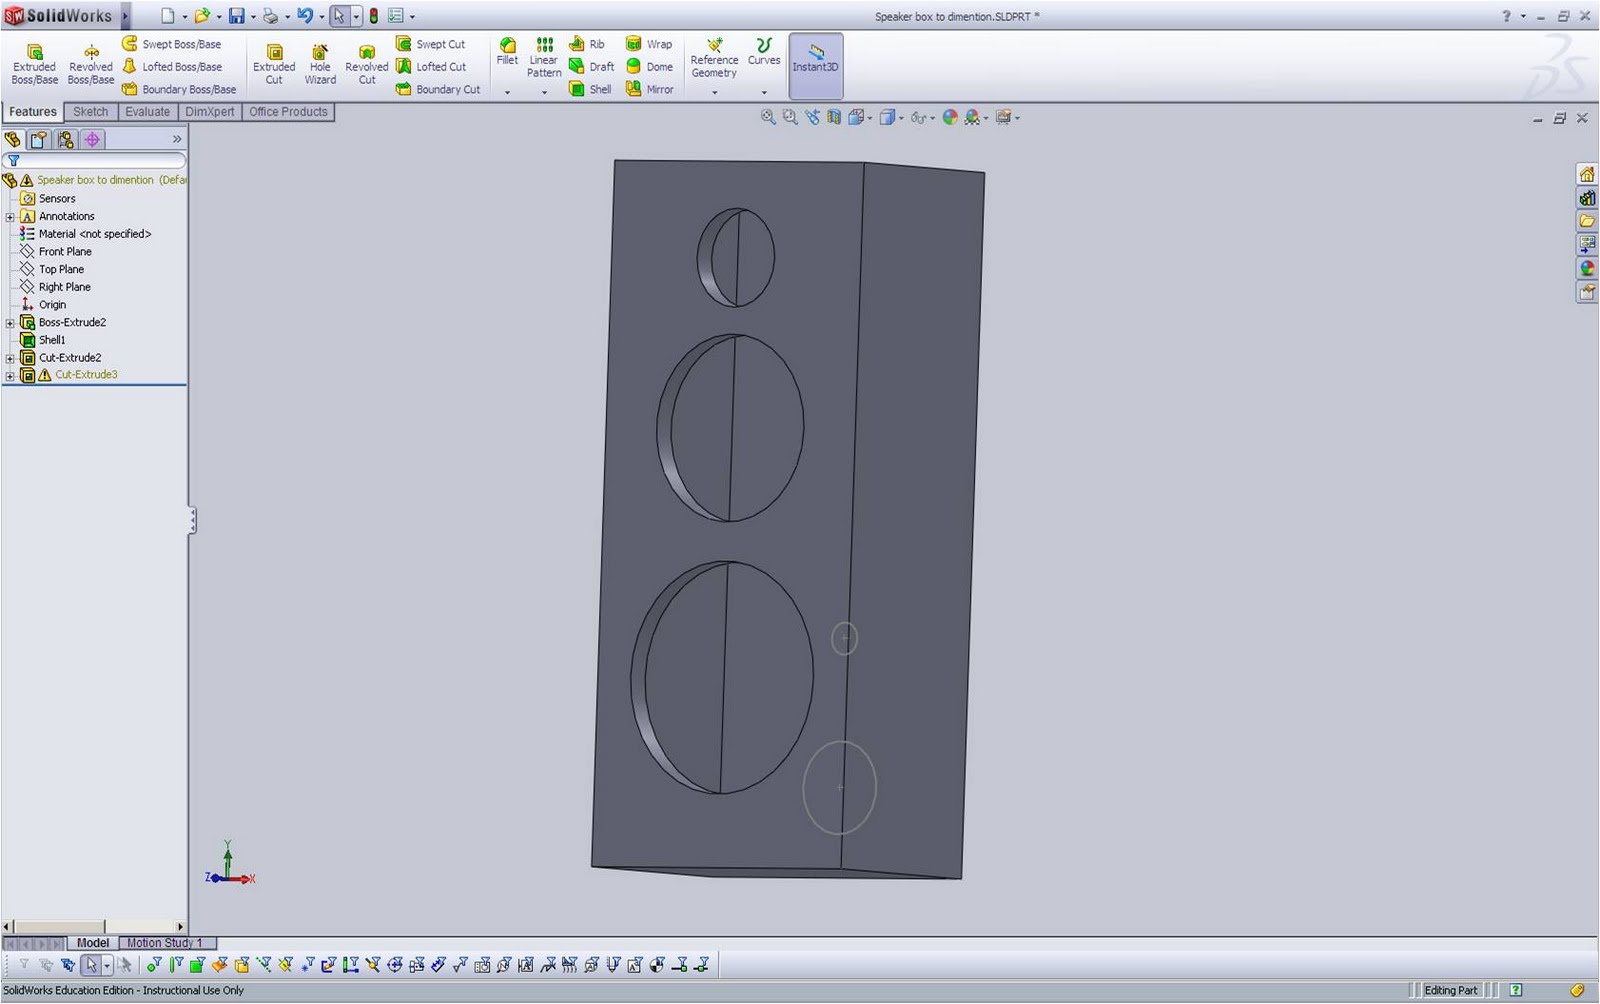
| Speaker Box - Pre-Cut Front Holes |
 |
| Speaker Box - Pre-Cut Rear Ports |
 |
| Speaker Box - Post-Cut Front Holes |
 |
| Final Box Unrenderd |
 |
| Technical Drawing of Speaker |
Diary Blog - Term 3 - Week 2
Week 2
This week i finished off cutting out my box, preparing it for gluing. One of the main things i had to do, was to check that the holes would support the speakers and that terminals would fit through the holes. This meant i had to Chisel squares into a side. The edges around the side of the hole had to be filed back to that the speaker would sit in snug and would be flat against the wood.
This week i finished off cutting out my box, preparing it for gluing. One of the main things i had to do, was to check that the holes would support the speakers and that terminals would fit through the holes. This meant i had to Chisel squares into a side. The edges around the side of the hole had to be filed back to that the speaker would sit in snug and would be flat against the wood.
Diary Blog - Term 3 - Week 1
Week 1
Mr. Mac gave the class a brief over view of what's happening this term, what is expected of us and when the dead lines are.This term we should have the boxes complete, including cut out, foamed, glued, painted and our crossovers finished.
Mr. Mac gave the class a brief over view of what's happening this term, what is expected of us and when the dead lines are.This term we should have the boxes complete, including cut out, foamed, glued, painted and our crossovers finished.
Friday, July 15, 2011
Diary Blog - Term 2 - Week 9
Week 9
This week i helped cut out my friends wood and helped setup the table saw. A few bits a pieces had to be modified to adjust due to the over cut and under cut of the table saw. Things went smoothly after many cuts.
Problem In-counted: The guide was set to long on the table saw, so wood was getting caught in the saw.
Problem Solved: We adjusted the length of the catch so that the wood would flake away from the saw.
Next Steps: Cut the holes for the bracing.
Diary Blog - Term 2 - Week 8
Week 8
This week i started cutting out the main pieces of my box. These include the left and right sides, the tops and bottoms and the front and back pieces for both boxes. We use the table saw to cut up all the wood under the supervision of our teacher, Mr Mac. The table saw helped me cut out all the wood fast and accurately. The table saw also allowed me to put a 45 Degree cut on the pieces of wood to allow for the miter joint.
Problem In-counted: The table saw still took awhile to set up for each piece of wood.
Problem Solved: I got a bunch of friends to help. In return I help them.
Next Steps: Help Friends and drill holes in the bracing wood.
Diary Blog - Term 2 - Week 11
Week 11
This week started to drill holes into the front pieces of my speakers. I am using a 6 1/4in hole cutter for my 6 1/2in woofer. 5in hole cutter for my 5 1/4in mid/woofer. 1 1/2in hole cutter for my 1 1/4in tweeter.
Problem In-counted: The teeth on the hole cutters were clogging up and cutting inefficiently.
Problem Solved: I used a different technique to the Cutter and also cleaned the teeth more often
Next Steps: Finnish cutting out holes for box.
Diary Blog - Term 2 - Week 10
Week 10
This week i cut the holes for my braces. There was a long waiting Que for the drills and cutters hence why it took so long to Finnish.
Problem In-counted: Some
Problem Solved: I found some tutorials on Solid-works
Next Steps: Start to render up my designs with Photo View.
This week i cut the holes for my braces. There was a long waiting Que for the drills and cutters hence why it took so long to Finnish.
Problem In-counted: Some
Problem Solved: I found some tutorials on Solid-works
Next Steps: Start to render up my designs with Photo View.
Diary Blog - Term 2 - Week 7
Week 7
During week seven i finalized my cutting list and driver placements. the whole class discovered that the measurements being used were the exterior measurements so our volume calculations will be off seeing as the MDF we are using is 18mm thick. so logically you would lose 36mm on each measurement. this in turn will make the LT smaller so we would lose the sound quality we all would like.
During week seven i finalized my cutting list and driver placements. the whole class discovered that the measurements being used were the exterior measurements so our volume calculations will be off seeing as the MDF we are using is 18mm thick. so logically you would lose 36mm on each measurement. this in turn will make the LT smaller so we would lose the sound quality we all would like.
Diary Blog - Term 2 - Week 6
Week 6
This week. Mr. Mac directed us to calculate up the total amount of wood needed for both of our speakers. This means getting all the measurements adding them up and finding the most efficient way to put them into a specified sheet of MDF. The two options we had for our types of wood were, MDF Or Marine Ply. The The Pro's and Con's Are, MDF is Good and consistent to build with, Easy to cut, Solid But looks bland. Marine Ply, is light, has a cool textures but is less solid and less consistent. It also doesn't cut as well as MDF. I Chose MDF.
Problem In-counted: Trying to get all the measurements together and into the specified size.
Problem Solved: I moved the pieces around to fit them into shape.
Next Steps: Continue to prepare to build my box.
Wednesday, June 8, 2011
Diary Blog - Term 2 - Week 5
Week 5
This week I defined more close represetion ntavolume for my box, and found out other aesthetics for my box, relating back to my research. These include MDF Thinkness, Durablilty and size
This week I defined more close represetion ntavolume for my box, and found out other aesthetics for my box, relating back to my research. These include MDF Thinkness, Durablilty and size
Tuesday, May 31, 2011
Diary Blog - Term 2 - Week 4
Week 4
This week we vainer-ed one side of our boxes to test out how vainer would look.
I also worked on the dimensions for my final box, trying perfect the liter.
Problem In-counted: I Placed a bit to much glue on my box and paper got stuck to my box
Problem Solved: I sanded off the paper.
Next Steps: To get final dimensions and get the cut out list done.
Friday, May 20, 2011
Diary Blog - Term 2 - Week 3
Week 3
~ This week i started to design prototype for my design instead of drawing them up on paper.
I like Solid Works because it's easy to change dimensions and get the correct ration of speaker size to box size. It's also easy to change things and save them. I have had previous experience with Solid Works which i have had to pick up again.
~ Also this week i stared to veneer one side of my box. A few tips on veneering are: Spreading out glue before pasting, Clamping with G-Clamps or A vice instead of trying to weigh it down to get the best hold.
Problem In-counted: I forgot how to use some of the features on solid works
Problem Solved: I found some tutorials on Solid-works
Next Steps: Start to render up my designs with Photo View.
Diary Blog - Term 2 - Week 2
Week 2
I spray painted my box black. I sprayed the front and the right side of my box. I tryed to apply some of the techniques that Mr. Mac showed me. I had never used a spray machine before. Lucky this was only a test box because the Finished product looked pretty bad.
Problem In-counted: I sprayed to heavily on the box, so the paint started to drip badly.
Problem Solved: Next time i was use more light strokes with the spray gun.
Next Steps: Continue designing the main speakers.
Subscribe to:
Posts (Atom)